
经过前面的 AOP(面向切面编程) 和 Transaction(事务管理),这次来到了 MVC(Web 应用,进行请求分发和处理)
Spring MVC 定义:
分离了控制器(Controller)、模型(Model)、分配器(Adapter)、视图(View)和处理程序对象(Handler,实际上调用的是 Controller 中定义的逻辑)。
基于 Servlet 功能实现,通过实现了 Servlet 接口的 DispatcherServlet 来封装其核心功能实现,通过将请求分派给处理程序,同时带有可配置的处理程序映射、视图解析、本地语言、主题解析以及上传文件支持。
同样老套路,本篇按照以下思路展开:
(1) 介绍如何使用
(2) 辅助工具类 ContextLoaderContext
(3) DispatcherServlet 初始化
(4) DispatcherServlet 处理请求
如何使用
代码结构如下:(详细代码可在文章末尾下载)
|
|
(1)配置 web.xml
在该文件中,主要配置了两个关键点:
1. contextConfigLocation :使 Web 和 Spring 的配置文件相结合的关键配置
2. DispatcherServlet : 包含了 SpringMVC 的请求逻辑,使用该类拦截 Web 请求并进行相应的逻辑处理
|
|
使用 IDEA 时,尽量选择默认条件和自动扫描加载 Web 配置文件,然后添加 tomcat 进行启动,具体配置请查阅 idea 创建java web项目ssm-gradle
(2) 配置 applicationContext.xml
|
|
可以在这里自定义想要加载的 bean,或者设置数据库数据源、事务管理器等等 Spring 应用配置。
(3) 配置 spring-mvc.xml
|
|
使用了 InternalResourceViewResolver,它是一个辅助 Bean,这样配置的意图是:
在 ModelAndView 返回的视图名前加上 prefix 指定的前缀和 suffix 的后缀(我理解为用来解析和返回视图,以及将视图层进行统一管理,放到指定路径中)
(4) 创建 BookController
|
|
可以看出,与书中示例并不一样,使用的是更贴合我们实际开发中用到的 @RequestMapping 等注解作为例子。根据请求的 URL 路径,匹配到对应的方法进行处理。
(5) 创建 jsp 文件
|
|
按照现在前后端分离的大趋势,我其实并不想用 jsp 视图技术作为例子,但考虑到之前入门时也接触过,也为了跟我一样不会写前端的同学更好理解,所以还是记录一下如何使用 jsp。
(6) 添加依赖 build.gradle
|
|
(7) 启动 Tomcat
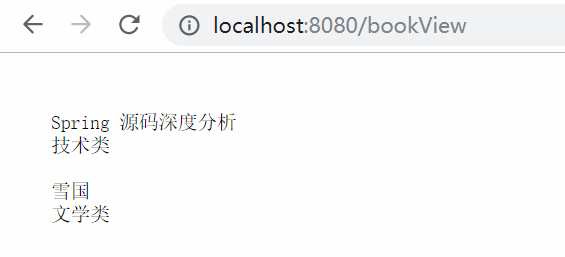
如何配置和启动,网上也有很多例子,参考资料 3 是个不错的例子,下面是请求处理结果:
http://localhost:8080/bookView (使用了 JSP 视图进行渲染)
http://localhost:8080/plain/value (前后端分离的话,常用的是这种,最后可以返回简单字符或者 json 格式的对象等)
在刚才的 web.xml 中有两个关键配置,所以现在学习下这两个配置具体是干啥的。
ContextLoaderContext
作用:在启动 web 容器时,自动装载 ApplicationContext 的配置信息。
下面是它的继承体系图:
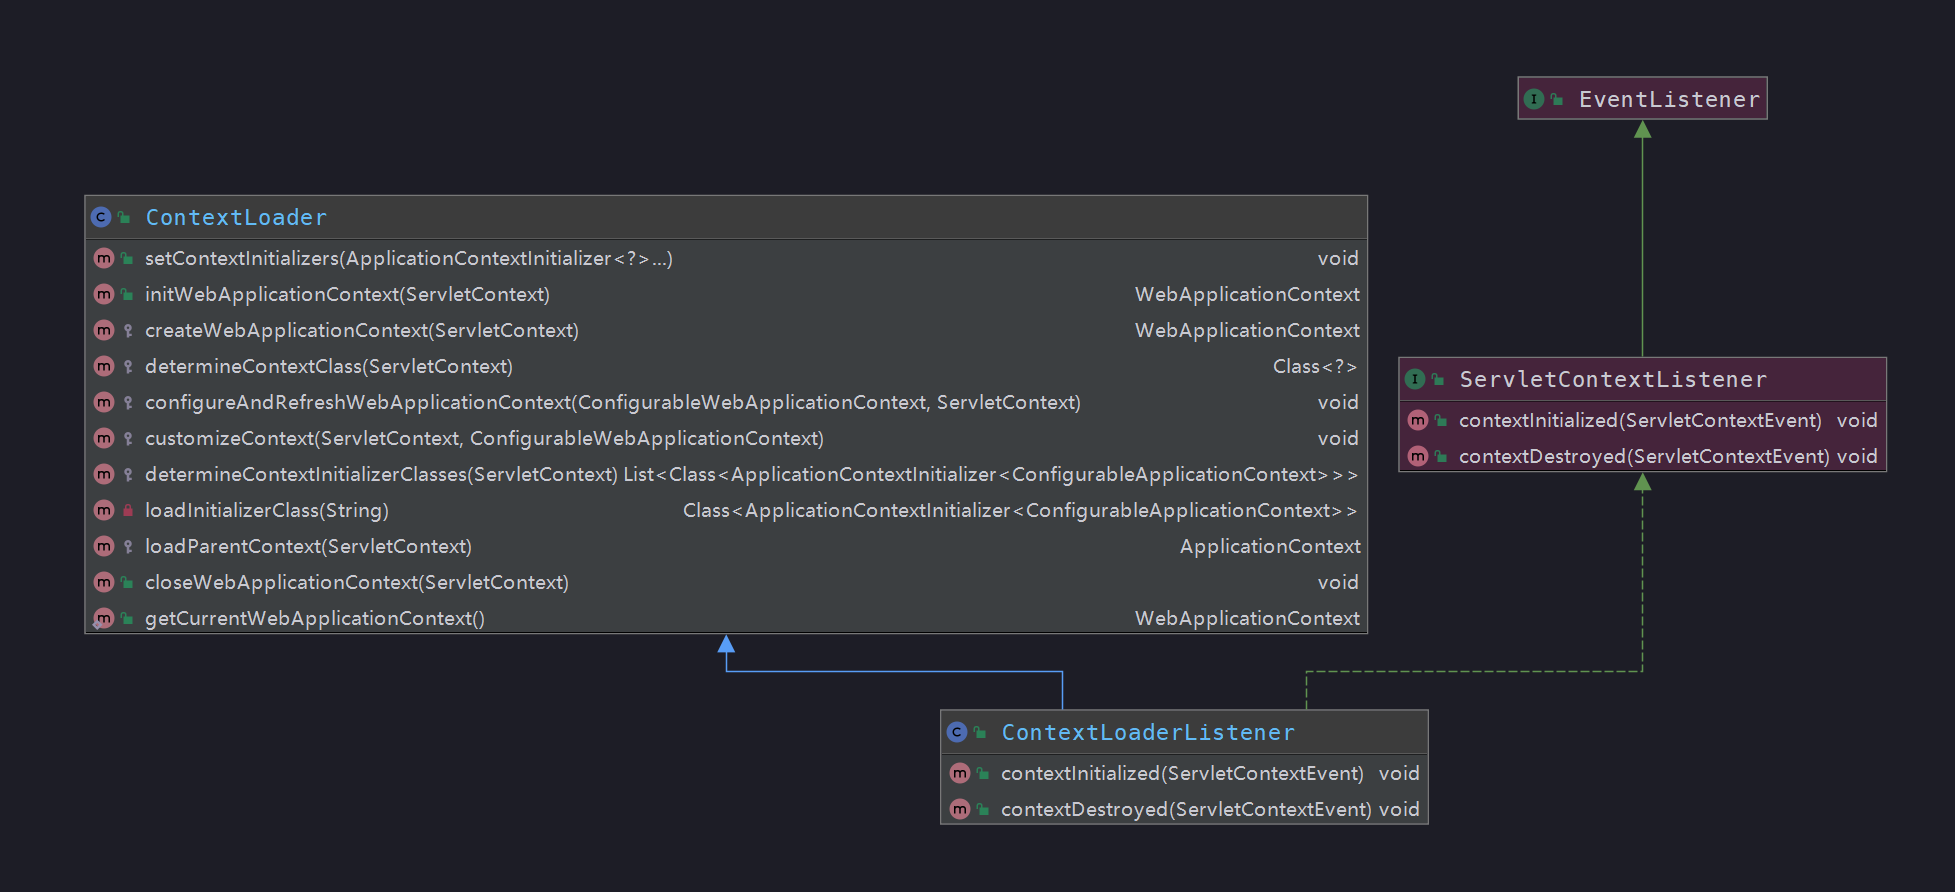
这是一个辅助工具类,可以用来传递配置信息参数,在 web.xml 中,将路径以 context-param 的方式注册并使用 ContextLoaderListener 进行监听读取。
从图中能看出,它实现了 ServletContextListener 这个接口,只要在 web.xml 配置了这个监听器,容器在启动时,就会执行 contextInitialized(ServletContextEvent) 这个方法,进行应用上下文初始化。
|
|
每个 Web 应用都会有一个 ServletContext 贯穿生命周期(在应用启动时创建,关闭时销毁),跟 Spring 中 ApplicationContext 类似,在全局范围内有效。
实际上初始化的工作,是由父类 ContextLoader 完成的:(简略版)
|
|
该函数主要是体现了创建 WebApplicationContext 实例的一个功能架构,实现的大致步骤如下:
1. WebApplicationContext 存在性的验证:
只能初始化一次,如果有多个声明,将会扰乱 Spring 的执行逻辑,所以有多个声明将会报错。
2. 创建 WebApplicationContext 实例:createWebApplicationContext(servletContext);
|
|
如果按照默认策略,它将会从配置文件 ContextLoader.properties 中读取需要创建的实现类:XmlWebApplicationContext
3. 将实例记录在 servletContext 中
4. 映射当前的类加载器与创建的实例到全局变量 currentContextPerThread 中
通过以上步骤,完成了创建 WebApplicationContext 实例,它继承自 ApplicaitonContext,在父类的基础上,追加了一些特定于 web 的操作和属性,可以把它当成我们之前初始化 Spring 容器时所用到的 ClassPathApplicaitonContext 那样使用。
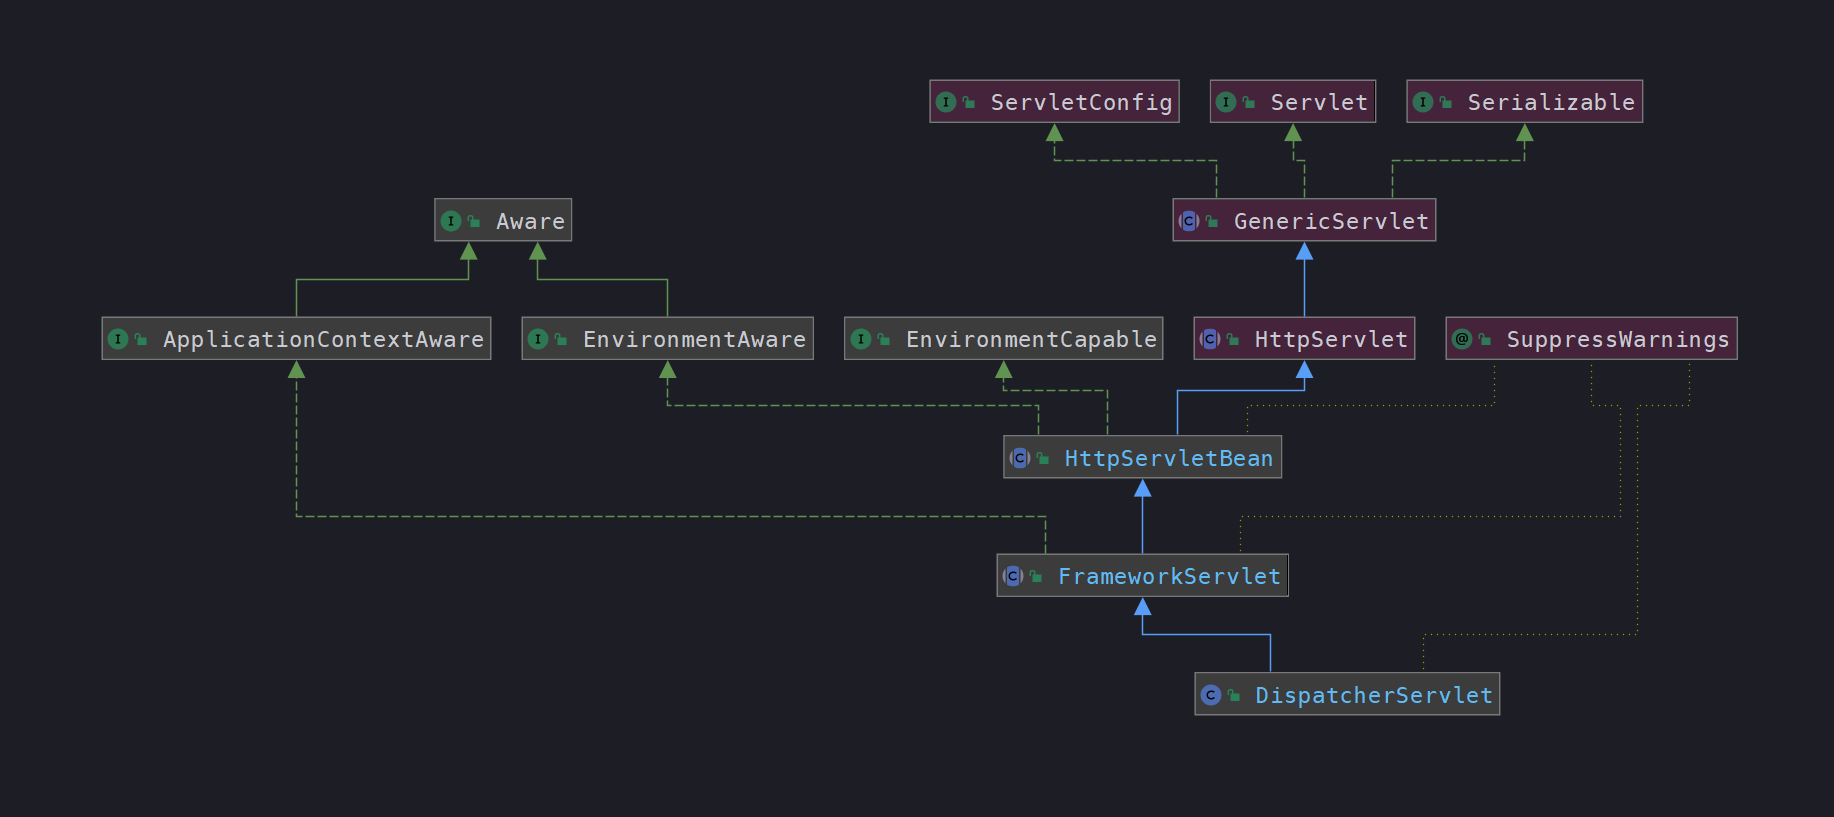
DispatcherServlet 初始化
该类是 spring-mvc 的核心,该类进行真正逻辑实现,DisptacherServlet 实现了 Servlet 接口。
介绍:
servlet是一个Java编写的程序,基于Http协议,例如我们常用的Tomcat,也是按照servlet规范编写的一个Java类
servlet的生命周期是由servlet的容器来控制,分为三个阶段:初始化、运行和销毁。
在 servlet 初始化阶段会调用其 init 方法:
HttpServletBean#init
|
|
在这里初始化 DispatcherServlet,主要是通过将当前的 servlet 类型实例转换为 BeanWrapper 类型实例,以便使用 Spring 中提供的注入功能进行相应属性的注入。
从上面注释,可以看出初始化函数的逻辑比较清晰,封装参数、转换成 BeanWrapper 实例、注册自定义属性编辑器、属性注入,以及关键的初始化 servletBean。
容器初始化
下面看下初始化关键逻辑:
FrameworkServlet#initServletBean
剥离了日志打印后,剩下的两行关键代码
|
|
WebApplicationContext 的初始化
FrameworkServlet#initWebApplicationContext
该函数的主要工作就是创建或刷新 WebApplicationContext 实例并对 servlet 功能所使用的变量进行初始化。
|
|
根容器查找
我们最常用到的 spring-mvc,是 spring 容器和 web 容器共存,这时 rootContext 父容器就是 spring 容器。
在前面的 web.xml 配置的监听器 ContextLaoderListener,已经将 Spring 父容器进行了加载
WebApplicationContextUtils#getWebApplicationContext(ServletContext)
|
|
同时,根据上面代码,了解到 Spring 父容器,是以 key 值为 : WebApplicationContext.class.getName() + ".ROOT" 保存到 ServletContext 上下文中。
根据 contextAttribute 寻找
虽然有默认 key,但用户可以重写初始化逻辑(在 web.xml 文件中设定 servlet 参数 contextAttribute),使用自己创建的 WebApplicaitonContext,并在 servlet 的配置中通过初始化参数 contextAttribute 指定 key。
|
|
重新创建实例
通过前面的方法都没找到,那就来重新创建一个新的实例:
FrameworkServlet#createWebApplicationContext(WebApplicationContext)
|
|
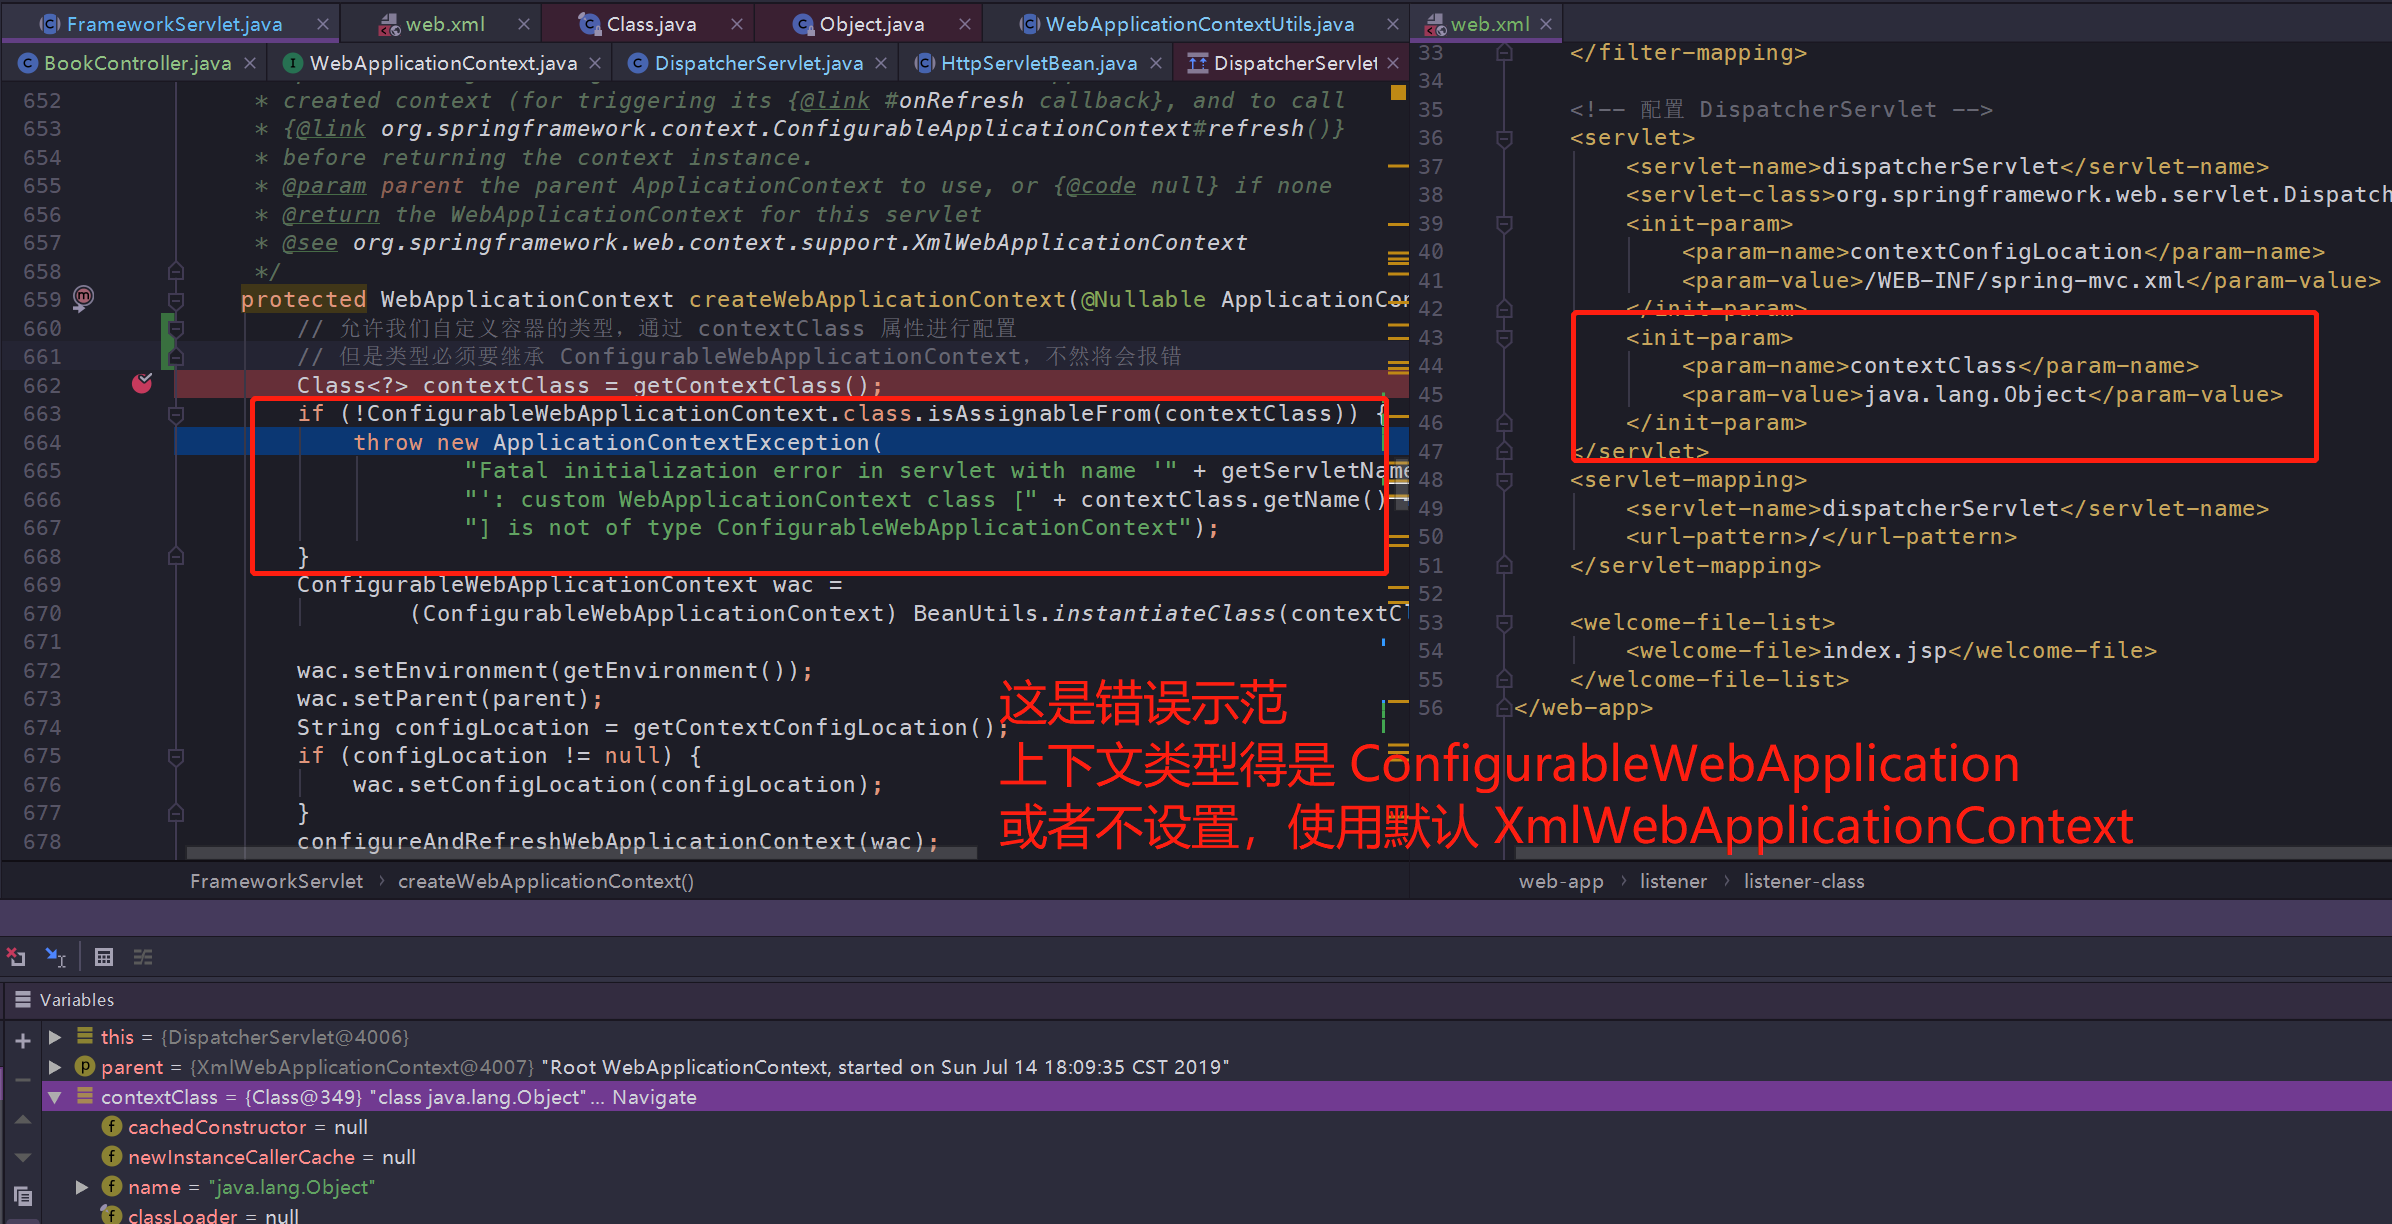
获取上下文类 contextClass
默认使用的是 XmlWebApplicationContext,但如果需要配置自定义上下文,可以在 web.xml 中的 <init-param> 标签中修改 contextClass 属性对应的 value,但需要注意图中提示:
configureAndRefreshWebApplicationContext
使用该方法,用来对已经创建的 WebApplicaitonContext 进行配置以及刷新
|
|
ApplicationContextInitializer
该类可以通过 <init-param> 的 contextInitializerClasses 进行自定义配置:
|
|
正如代码中的顺序一样,是在 mvc 容器创建前,执行它的 void initialize(C applicationContext) 方法:
|
|
所有如果没有配置的话,默认情况下 contextInitializers 列表为空,表示没有 ApplicationContextInitializer 需要执行。
加载 Spring 配置
wac.refresh(),实际调用的是我们之前就很熟悉的刷新方法:
org.springframework.context.support.AbstractApplicationContext#refresh
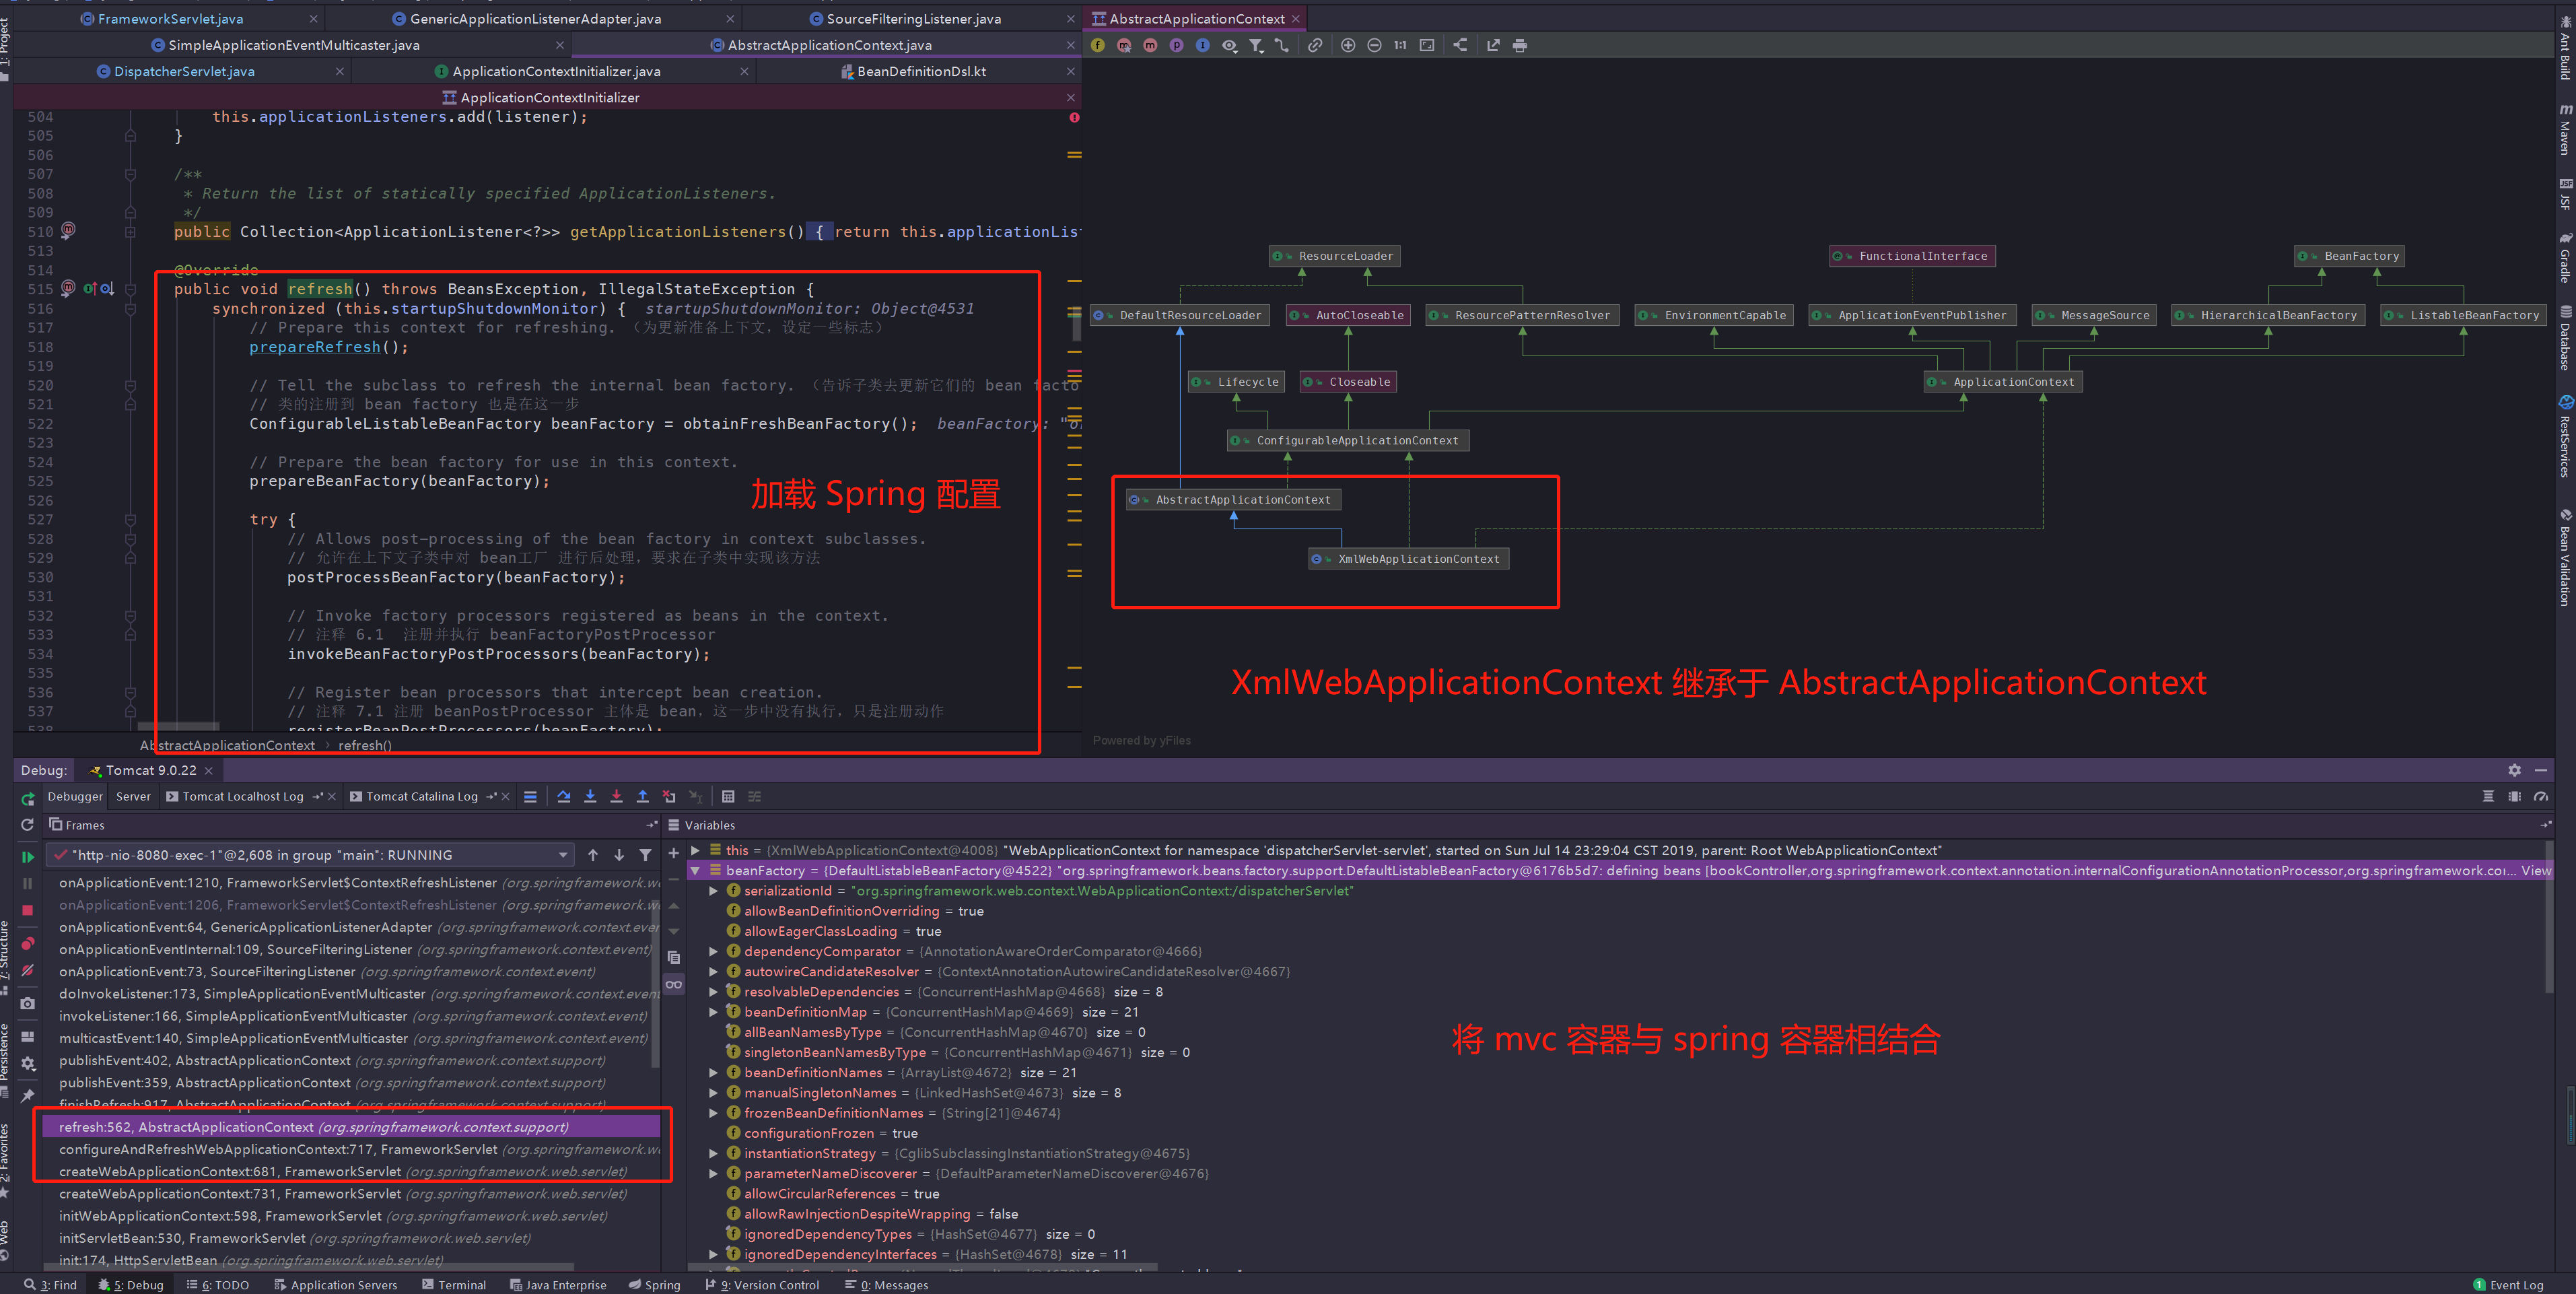
从图中能够看出,刷新方法的代码逻辑与之前一样,通过父类 AbstractApplicationContext 的 refresh 方法,进行了配置文件的加载。
在例子中的 web.xml 配置中,指定了加载 spring-mvc.xml 配置文件
|
|
注册 mvc 解析器
由于我们配置了 contextConfigLocation,指定了加载资源的路径,所以在 XmlWebApplicationContext 初始化的时候,加载的 Spring 配置文件路径是我们指定 spring-mvc.xml:

在 spring-mvc.xml 配置中,主要配置了三项
|
|
同样老套路,使用了 <mvc:annotation> 自定义注解的话,要注册相应的解析器后,Spring 容器才能解析元素:
org.springframework.web.servlet.config.MvcNamespaceHandler
|
|
可以看到,mvc 提供了很多便利的注解,有拦截器、资源、视图等解析器,但我们常用的到的是 anntation-driven 注解驱动,这个注解通过 AnnotationDrivenBeanDefinitionParser 类进行解析,其中会注册两个重要的 bean :
|
|
跳过其他熟悉的 Spring 初始化配置,通过上面的步骤,完成了 Spring 配置文件的解析,将扫描到的 bean 加载到了 Spring 容器中。
那么下面就正式进入 mvc 的初始化。
mvc 初始化
onRefresh 方法是 FrameworkServlet 类中提供的模板方法,在子类 DispatcherServlet 进行了重写,主要用来刷新 Spring 在 Web 功能实现中所必须用到的全局变量:
|
|
该函数是实现 mvc 的关键所在,先来大致介绍一下初始化的套路:
- 寻找用户自定义配置
- 没有找到,使用默认配置
显然,Spring 给我们提供了高度的自定义,可以手动设置想要的解析器,以便于扩展功能。
如果没有找到用户配置的 bean,那么它将会使用默认的初始化策略: getDefaultStrategies 方法
默认策略
DispatcherServlet#getDefaultStrategies(缩减版)
|
|
从静态默认策略属性 defaultStrategies 的加载过程中,读取的是 DispatcherServlet.properties 文件内容,看完下面列出来的信息,相信你跟我一样恍然大悟,了解 Spring 配置了哪些默认策略:
|
|
接下来看看它们各自的初始化过程以及使用场景:
multipartResolver 文件上传相关
|
|
默认情况下,Spring 是没有 mulitpart 处理,需要自己设定
|
|
注册的 id 为 multipartResolver
LocalResolver 与国际化相关
LocalResolver 接口定义了如何获取客户端的地区
|
|
通过寻找 id 为 localeResolver 的 bean,如果没有的话,将会使用默认的策略进行加载 AcceptHeaderLocaleResolver,它是基于 URL 参数来控制国际化,例如使用 <a href="?locale=zh_CN"> 来设定简体中文,默认参数名为 locale。
当然还有其他两种,基于 session 和基于 cookie 的配置,想要深入了解的可以去细看~
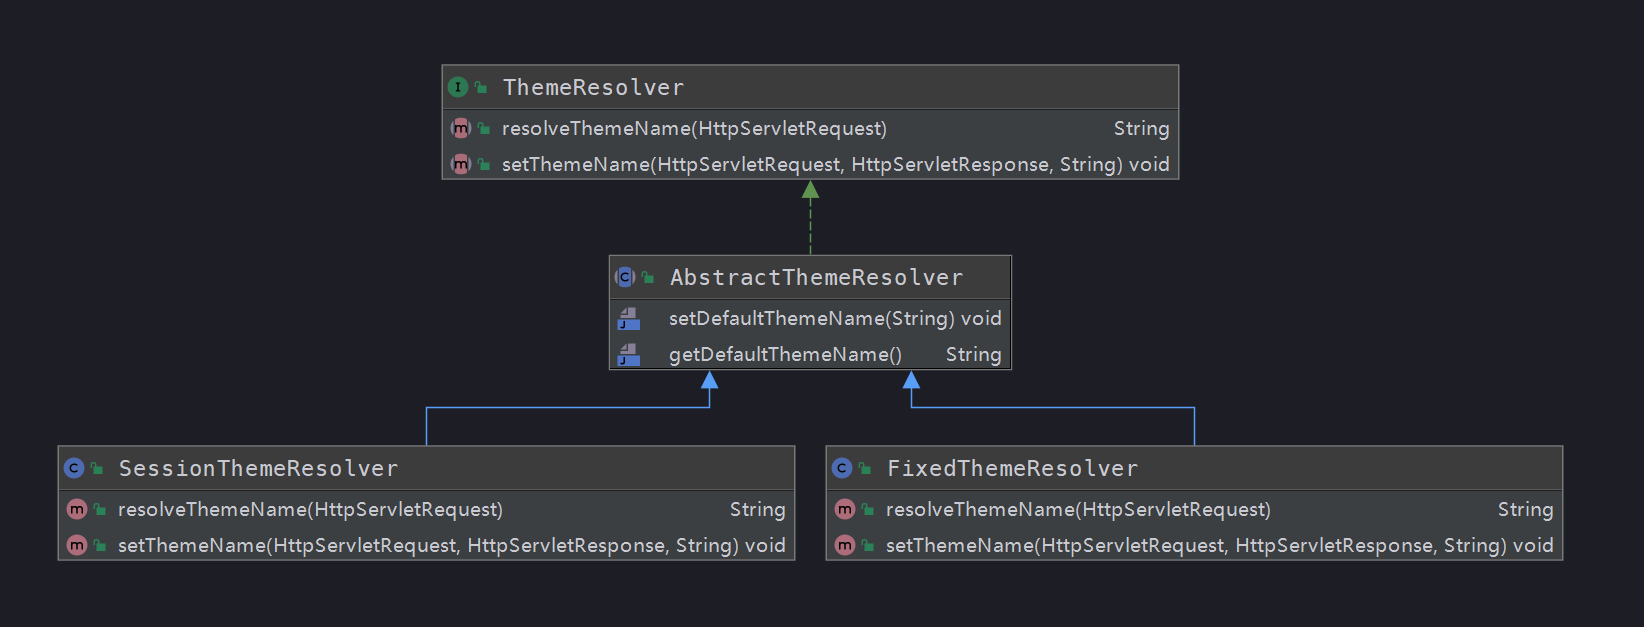
ThemeResolver 主题更换相关
主题是一组静态资源(例如样式表 css 和图片 image),也可以理解为应用皮肤,使用 Theme 更改主题风格,改善用户体验。
默认注册的 id 是 themeResolver,类型是 FixedThemeResolver,表示使用的是一个固定的主题,以下是它的继承体系图:
工作原理是通过拦截器拦截,配置对应的主题解析器,然后返回主题名称,还是使用上面的解析器作为例子:
FixedThemeResolver#resolveThemeName
|
|
HandlerMapping 与匹配处理器相关
首先判断 detectAllHandlerMappings 变量是否为 true,表示是否需要加载容器中所有的 HandlerMapping,false 将会加载用户配置的。
如注释所说,至少得保证有一个 HandlerMapping,如果前面两个分支都没寻找到,那么就进行默认策略加载。
|
|
通过 Debug 得知,之前在加载 Spring 配置时,就已经注入了 RequestMappingHandlerMapping 和 BeanNameUrlHandlerMapping

HandlerAdapter 适配器
套路与前面的一样,使用的默认策略是:HttpRequestHandlerAdapter 、SimpleControllerHandlerAdapter、 RequestMappingHandlerAdapter 和 HandlerFunctionAdapter。
说到适配器,可以将它理解为,将一个类的接口适配成用户所期待的,将两个接口不兼容的工作类,通过适配器连接起来。
HandlerExceptionResolver 处理器异常解决器
套路也与前面一样,使用的默认策略是:ExceptionHandlerExceptionResolver、 ResponseStatusExceptionResolver 和 DefaultHandlerExceptionResolver。
实现了 HandlerExceptionResolver 接口的 resolveException 方法,在方法内部对异常进行判断,然后尝试生成 ModelAndView 返回。
|
|
RequestToViewNameTranslator 处理逻辑视图名称
初始化代码逻辑与前面一样,使用的默认策略是:DefaultRequestToViewNameTranslator
使用场景:当 Controller 处理器方法没有返回逻辑视图名称时,Spring 通过该类的约定,提供一个逻辑视图名称。
由于本地测试不出来,所以引用参考资料 7 的例子:
DefaultRequestToViewNameTranslator的转换例子:
http://localhost:8080/gamecast/display.html -> display(视图)
ViewResolver 视图渲染
套路还是跟前面一样,默认策略使用的是:InternalResourceViewResolver
同时,这也是 demo 中,我们手动配置的视图解析器
FlashMapManager 存储属性
默认使用的是:SessionFlashMapManager,通过与 FlashMap 配合使用,用于在重定向时保存/传递参数。
例如 Post/Redirect/Get 模式,Flash attribute 在重定向之前暂存(根据类名,可以知道范围是 session 级别有效),以便重定向之后还能使用。
RequestMappingHandler
该类作用:配合 @Controller 和 @RequestMapping 注解使用,通过 URL 来找到对应的处理器。
前面在 spring-mvc.xml 文件加载时,初始化了两个重要配置,其中一个就是下面要说的 RequestMappingHandler,先来看它的继承体系图:
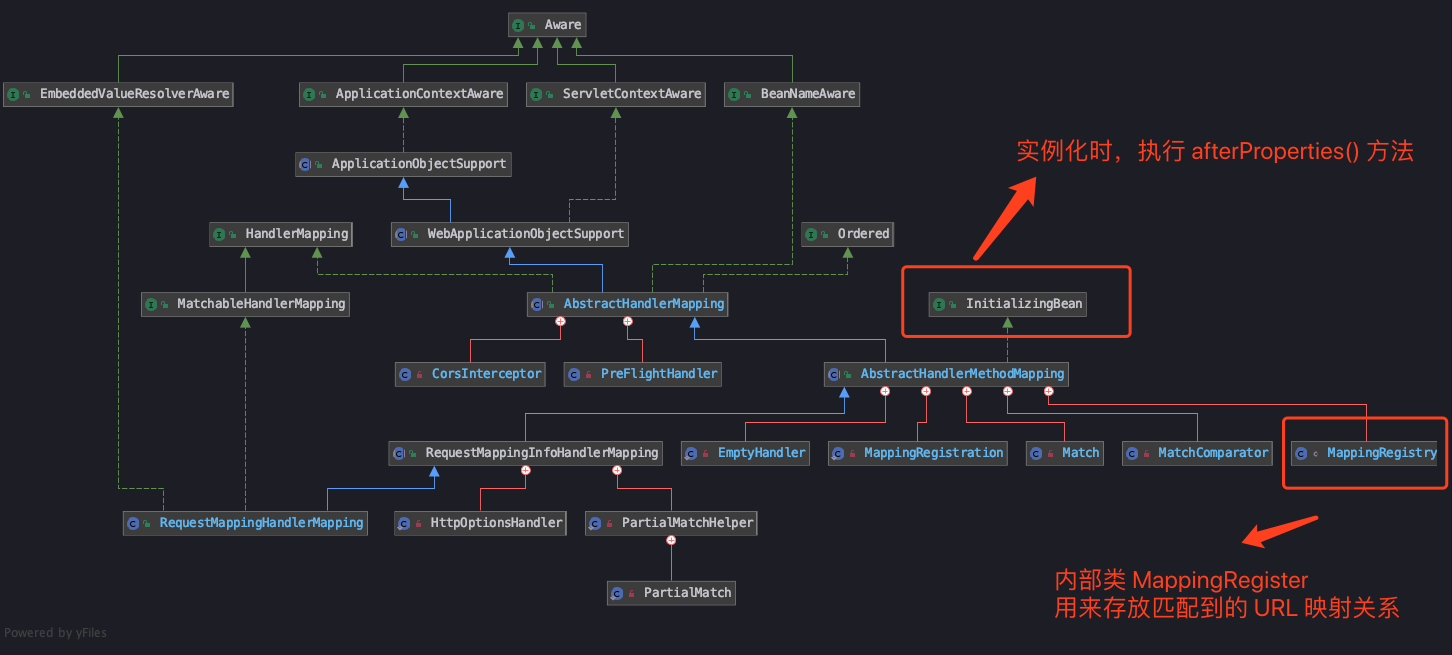
从继承图中看到,它实现了 InitializingBean 接口,所以在初始化时,将会执行 afterPropertiesSet 方法(图片中注释写错方法,请以下面为准),核心调用的初始化方法是父类 AbstractHandlerMethodMapping#initHandlerMethods 方法
AbstractHandlerMethodMapping#initHandlerMethods
|
|
梳理一下代码逻辑,initHandlerMethods 方法将会扫描注册 bean 下所有公共 public 方法,如果带有 @RequestMapping 注解的,将会组装成 RequestMappingInfo 映射关系,然后将它注册到 mappingRegistry 变量中。之后可以通过映射关系,输入 URL 就能够找到对应的处理器 Controller。
MappingRegistry
该类是 AbstractHandlerMethodMapping 的内部类,是个工具类,用来保存所有 Mapping 和 handler method,通过暴露加锁的公共方法,避免了多线程对该类的内部变量的覆盖修改。
下面是注册的逻辑:
|
|
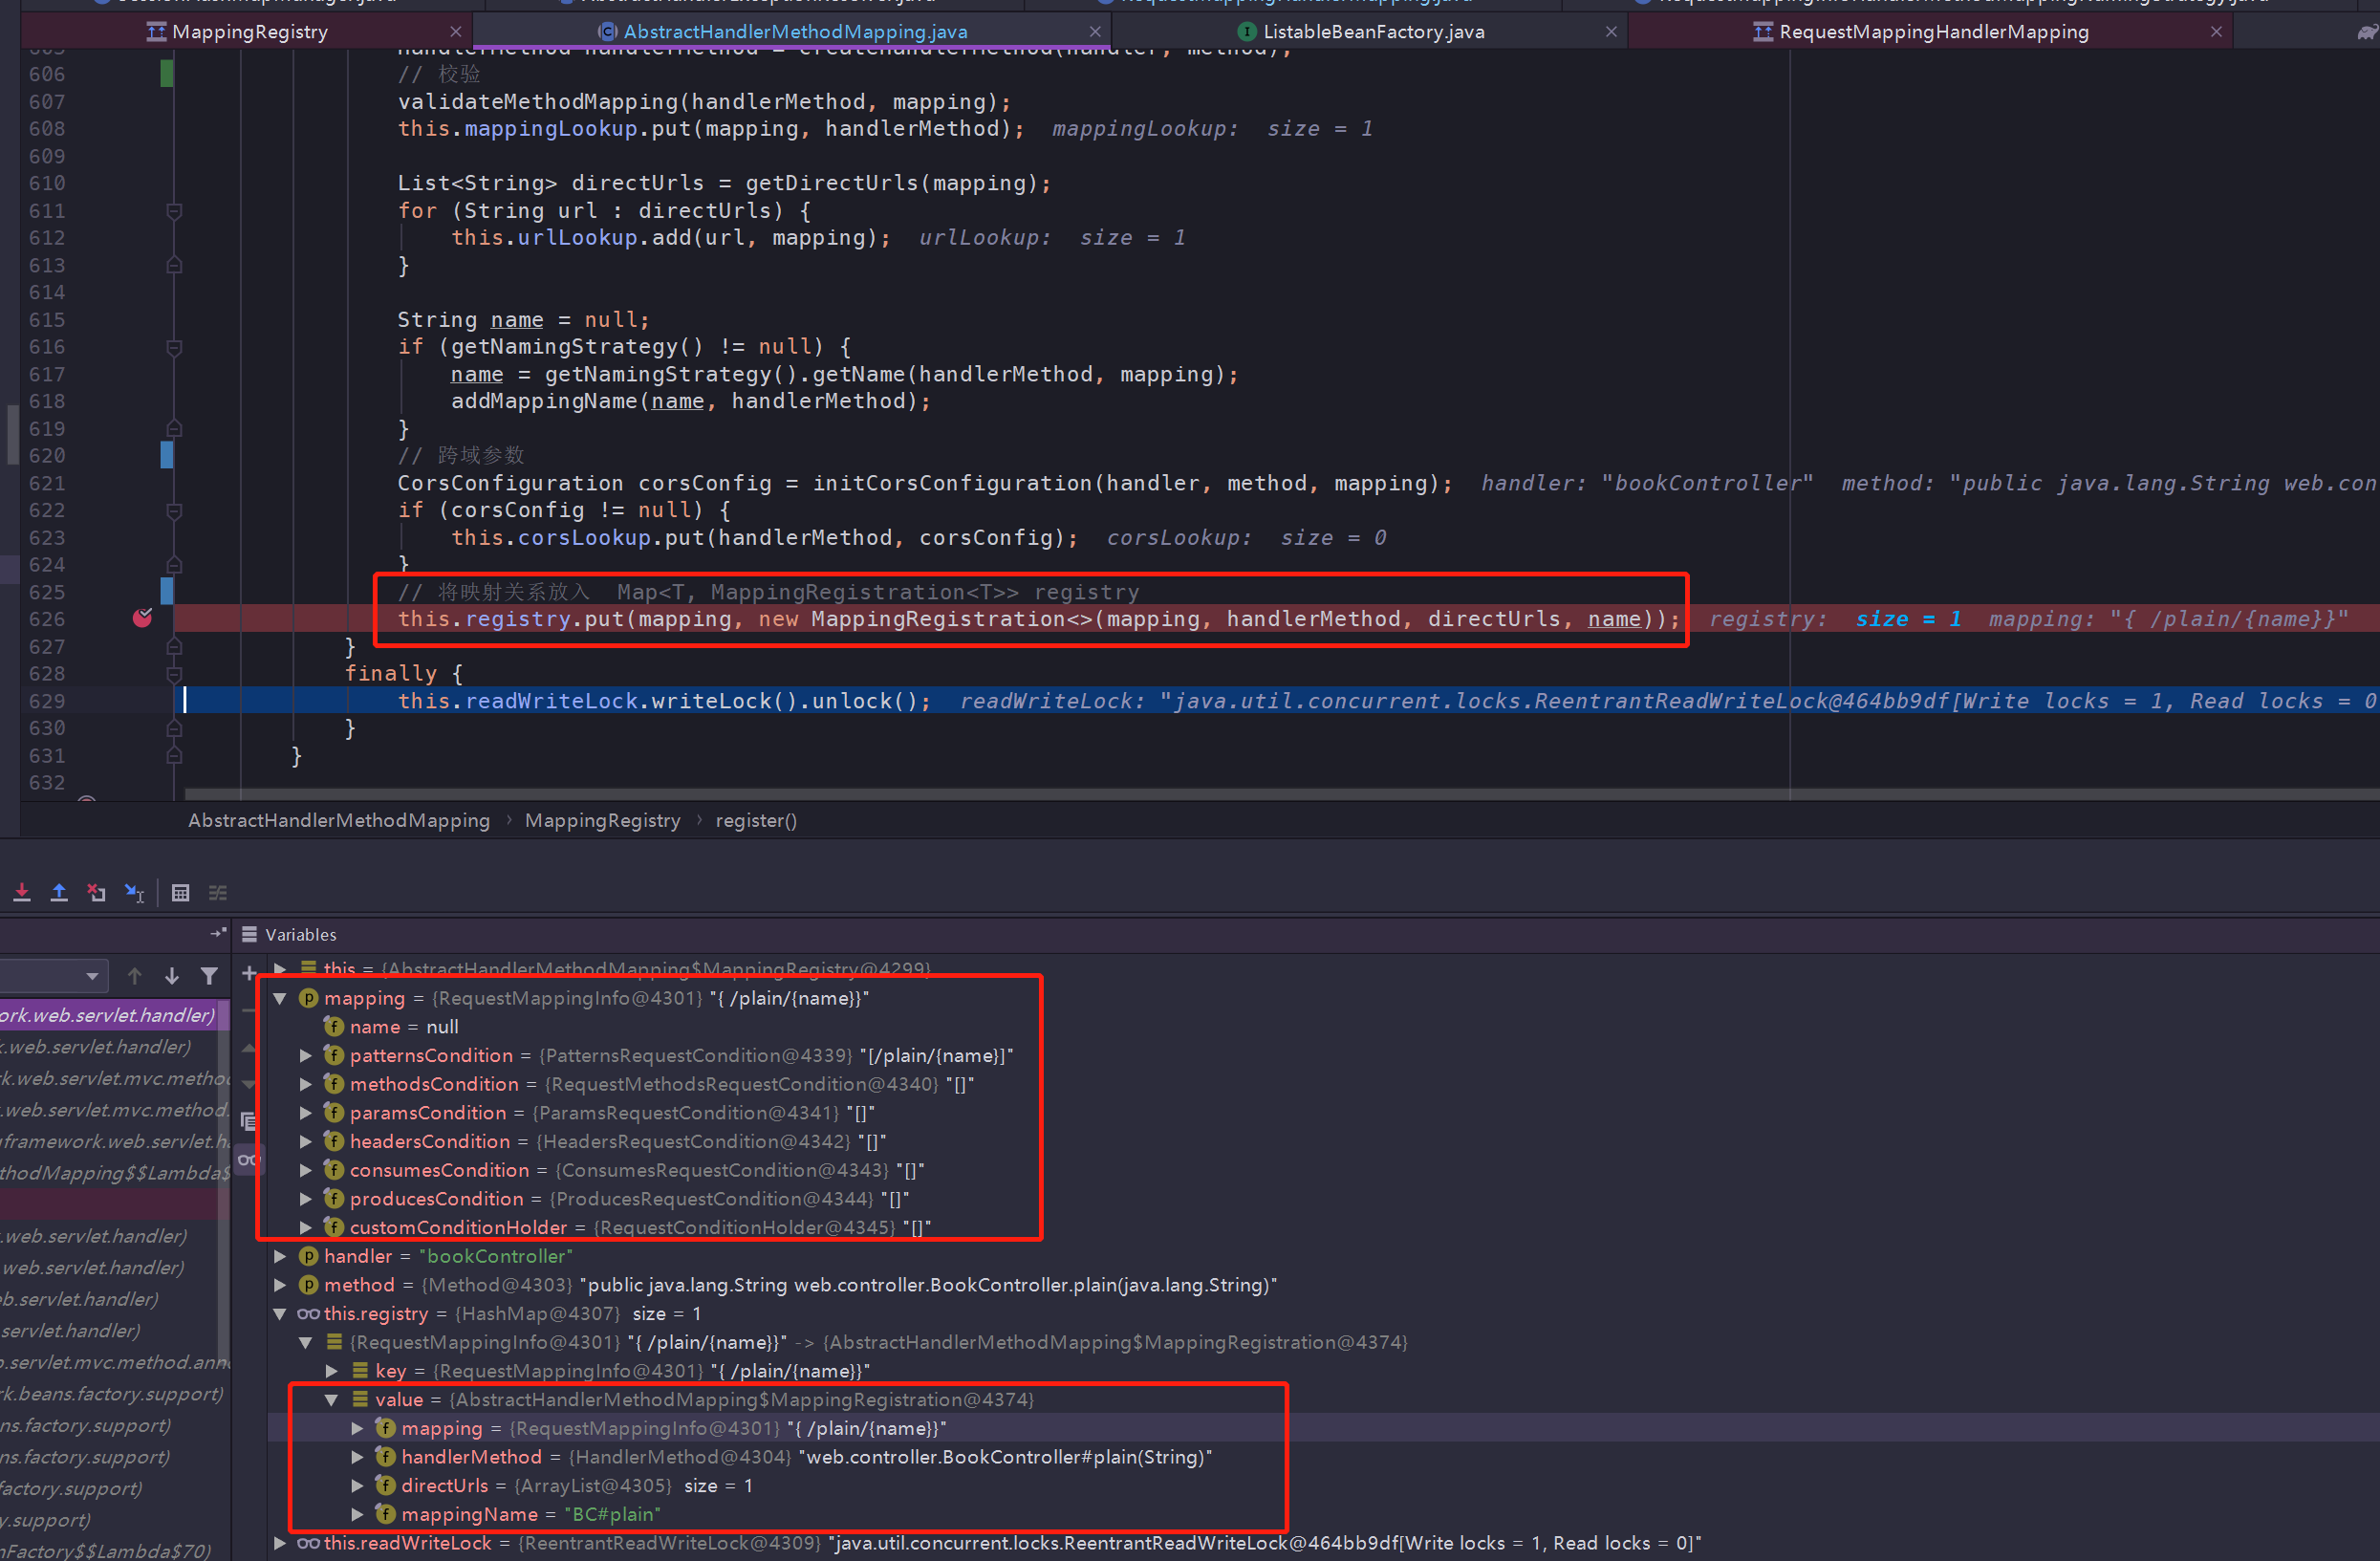
通过前面的包装和校验方法,最后映射关系将会放入这里 Map<T, MappingRegistration<T>> registry。它是一个泛型的 Map,key 类型是 RequestMappingInfo,保存了 @RequestMapping 各种属性的集合,value 类型是 AbstractHandlerMethodMapping,保存的是我们的映射关系。
从图中可以看出,如果输入的 URL 是 /plain/{name},将会找到对应的处理方法 web.controller.BookController#plain{String}。
RequestMappingHandlerAdapter
而另一个重要的配置就是处理器适配器 RequestMappingHandlerAdapter,由于它的继承体系与 RequestMappingHandler 类似,所以我们直接来看它在加载时执行的方法
RequestMappingHandlerAdapter#afterPropertiesSet
|
|
所以看到这个适配器中,初始化了很多工具变量,用来处理 @ControllerAdvice 、InitBinder 等注解和参数。不过核心还是待会要讲到的 handleInternal() 方法,它将适配处理器调用,然后返回 ModelView 视图。
DispatcherServlet 的逻辑处理
请求处理的入口定义在 HttpServlet,主要有以下几个方法:
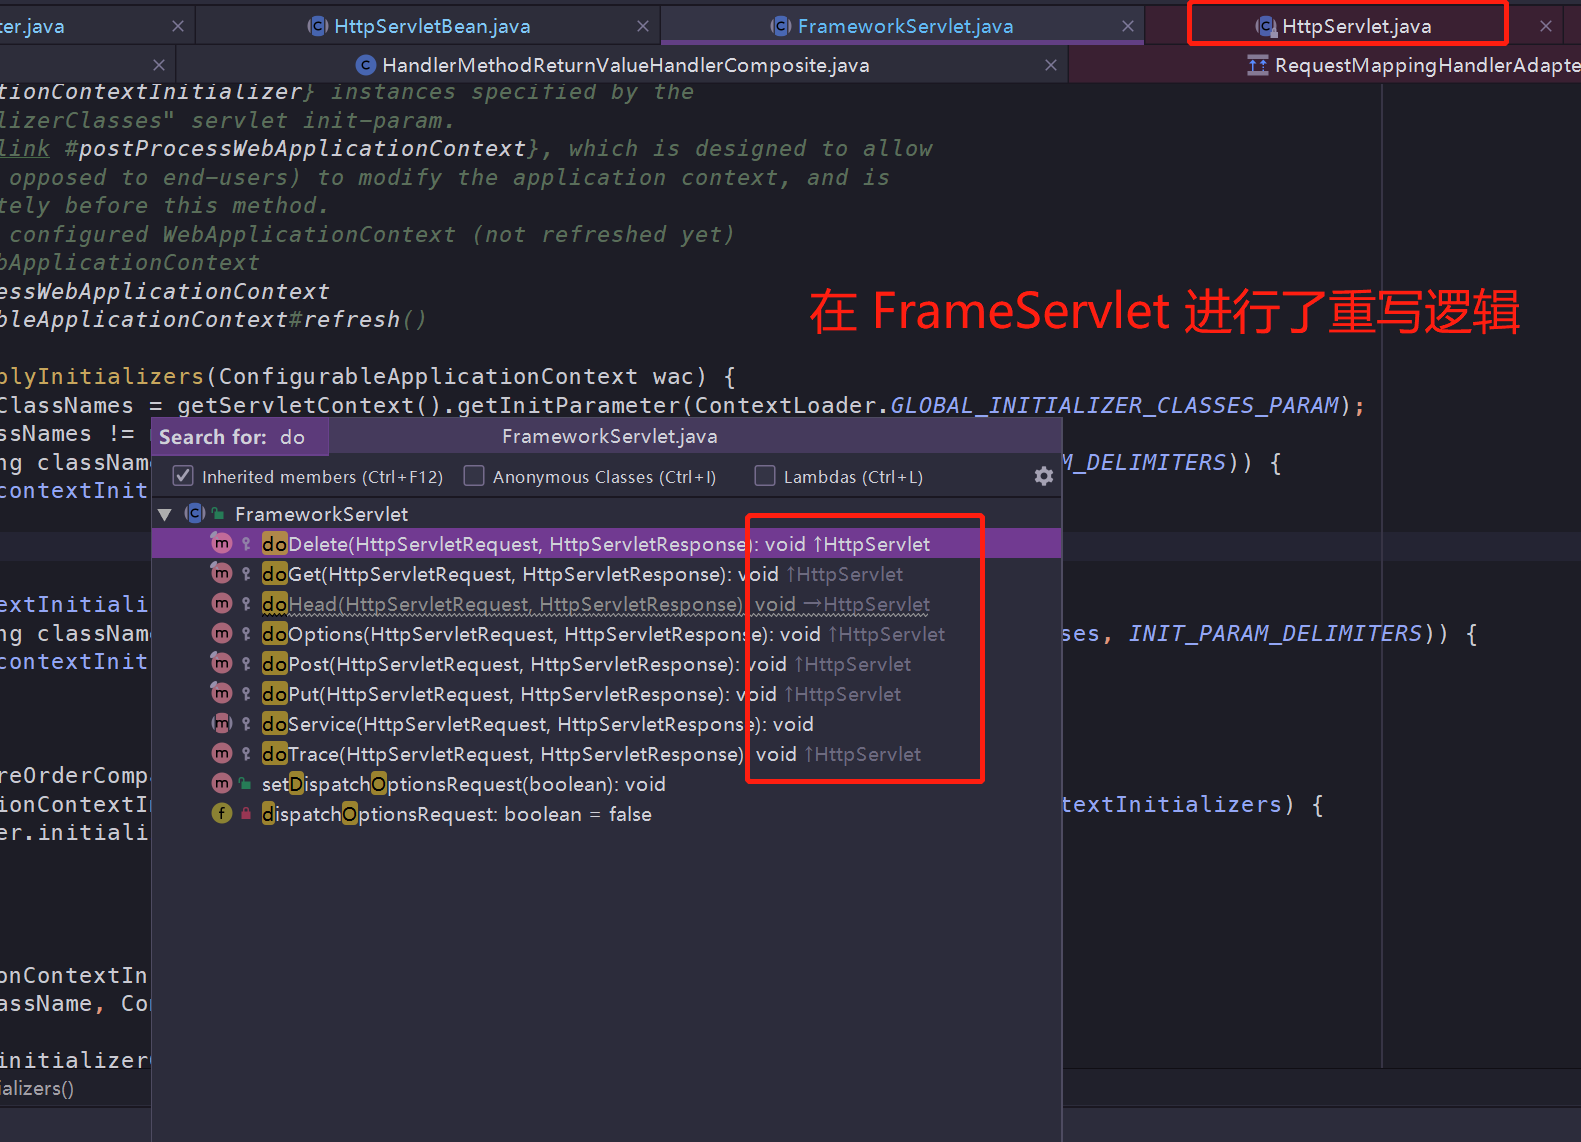
当然,父类 HttpServlet 只是给出了定义,直接调用父类这些方法将会报错,所以 FrameworkServlet 将它们覆盖重写了处理逻辑:
|
|
可以看到 doGet 、doPost 这些方法,底层调用的都是 processRequest 方法进行处理,关键方法是委托给子类 DispatcherServlet 的 doServie() 方法
DispatcherServlet#doService
|
|
请求分发和处理逻辑的核心是在 doDispatch(request, response) 方法中,在进入这个方法前,还有些准备工作需要执行。
请求上下文
在 processRequest 的 doServie() 方法执行前,主要做了这以下准备工作:
(1) 为了保证当前线程的 LocaleContext 以及 RequestAttributes 可以在当前请求后还能恢复,提取当前线程的两个属性。
(2) 根据当前 request 创建对应的 LocaleContext 以及 RequestAttributes,绑定到当前线程
(3) 往 request 对象中设置之前加载过的 localeResolver、flashMapManager 等辅助工具变量
请求分发 doDispatch
经过前面的配置设置,doDispatch 函数展示了请求的完成处理过程:
DispatcherServlet#doDispatch
|
|
上面贴出来的代码略有缩减,不过从上面示例中能看出,整体的逻辑都挺清晰的,主要步骤如下:
1. 寻找处理器 mappedandler
2. 根据处理器,寻找对应的适配器 HandlerAdapter
3. 激活 handler,调用处理方法
4. 返回结果(如果有 mv,进行视图渲染和跳转)
寻找处理器 mappedHandler
以 demo 说明,寻找处理器,就是根据 URL 找到对应的 Controller 方法
DispatcherServlet#getHandler
|
|
实际上,在这一步遍历了所有注册的 HandlerMapping,然后委派它们去寻找处理器,如果找到了合适的,就不再往下寻找,直接返回。
同时,HandlerMapping 之间有优先级的概念,根据 mvc 包下 AnnotationDrivenBeanDefinitionParser 的注释:
This class registers the following {@link HandlerMapping HandlerMappings}
@link RequestMappingHandlerMapping
ordered at 0 for mapping requests to annotated controller methods.
说明了 RequestMappingHandlerMapping 的优先级是最高的,优先使用它来寻找适配器。
具体寻找调用的方法:
AbstractHandlerMapping#getHandler
|
|
(1) getHandlerInternal(request) 函数作用:
根据 request 信息获取对应的 Handler,也就是我们例子中的,通过 URL 找到匹配的 Controller 并返回。
(2) getHandlerExcetionChain 函数作用:
将适应该 URL 对应拦截器 MappedInterceptor 加入 addInterceptor() 到执行链 HandlerExecutionChain 中。
(3) CorsConfiguration
这个参数涉及到跨域设置,具体看下这篇文章:SpringBoot下如何配置实现跨域请求?
寻找适配器 HandlerAdapter
前面已经找到了对应的处理器了,下一步就得找到它对应的适配器
DispatcherServlet#getHandlerAdapter
|
|
同样,HandlerAdapter 之间也有优先级概念,由于第 0 位是 RequestMappingHandlerAdapter,而它的 supports 方法总是返回 true,所以毫无疑问返回了它
请求处理
通过适配器包装了一层,处理请求的入口如下:
RequestMappingHandlerAdapter#handleInternal
|
|
通过 invokeHandlerMethod 方法,调用对应的 Controller 方法逻辑,包装成 ModelAndView。
Session 代码块
判断 synchronizeOnSession 是否开启,开启的话,同一个 session 的请求将会串行执行(Object mutex = WebUtils.getSessionMutex(session))
自定义参数解析
解析逻辑由 RequestParamMethodArgumentResolver 完成,具体请查看 spring-mvc
逻辑处理
InvocableHandlerMethod#invokeForRequest
|
|
通过给定的参数,doInvoke 使用了反射操作,执行了 Controller 方法的逻辑。
返回值解析
拿 http://localhost:8080/bookView 作为例子,经过前面的逻辑处理后,返回的只是试图名称 bookView,在这时,使用到了 ViewNameMethodReturnValueHandler
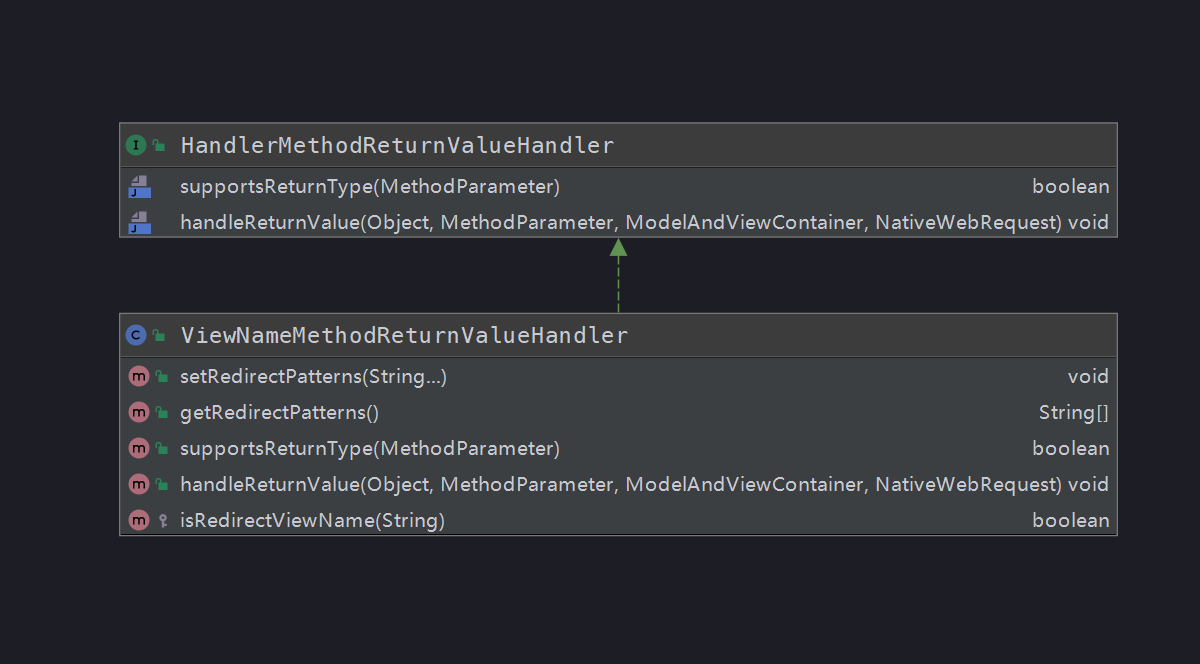
可以看到它实现了 HandlerMethodReturnValueHandler 接口的两个方法
ViewNameMethodReturnValueHandler#supportsReturnType; 表示支持处理的返回类型
|
|
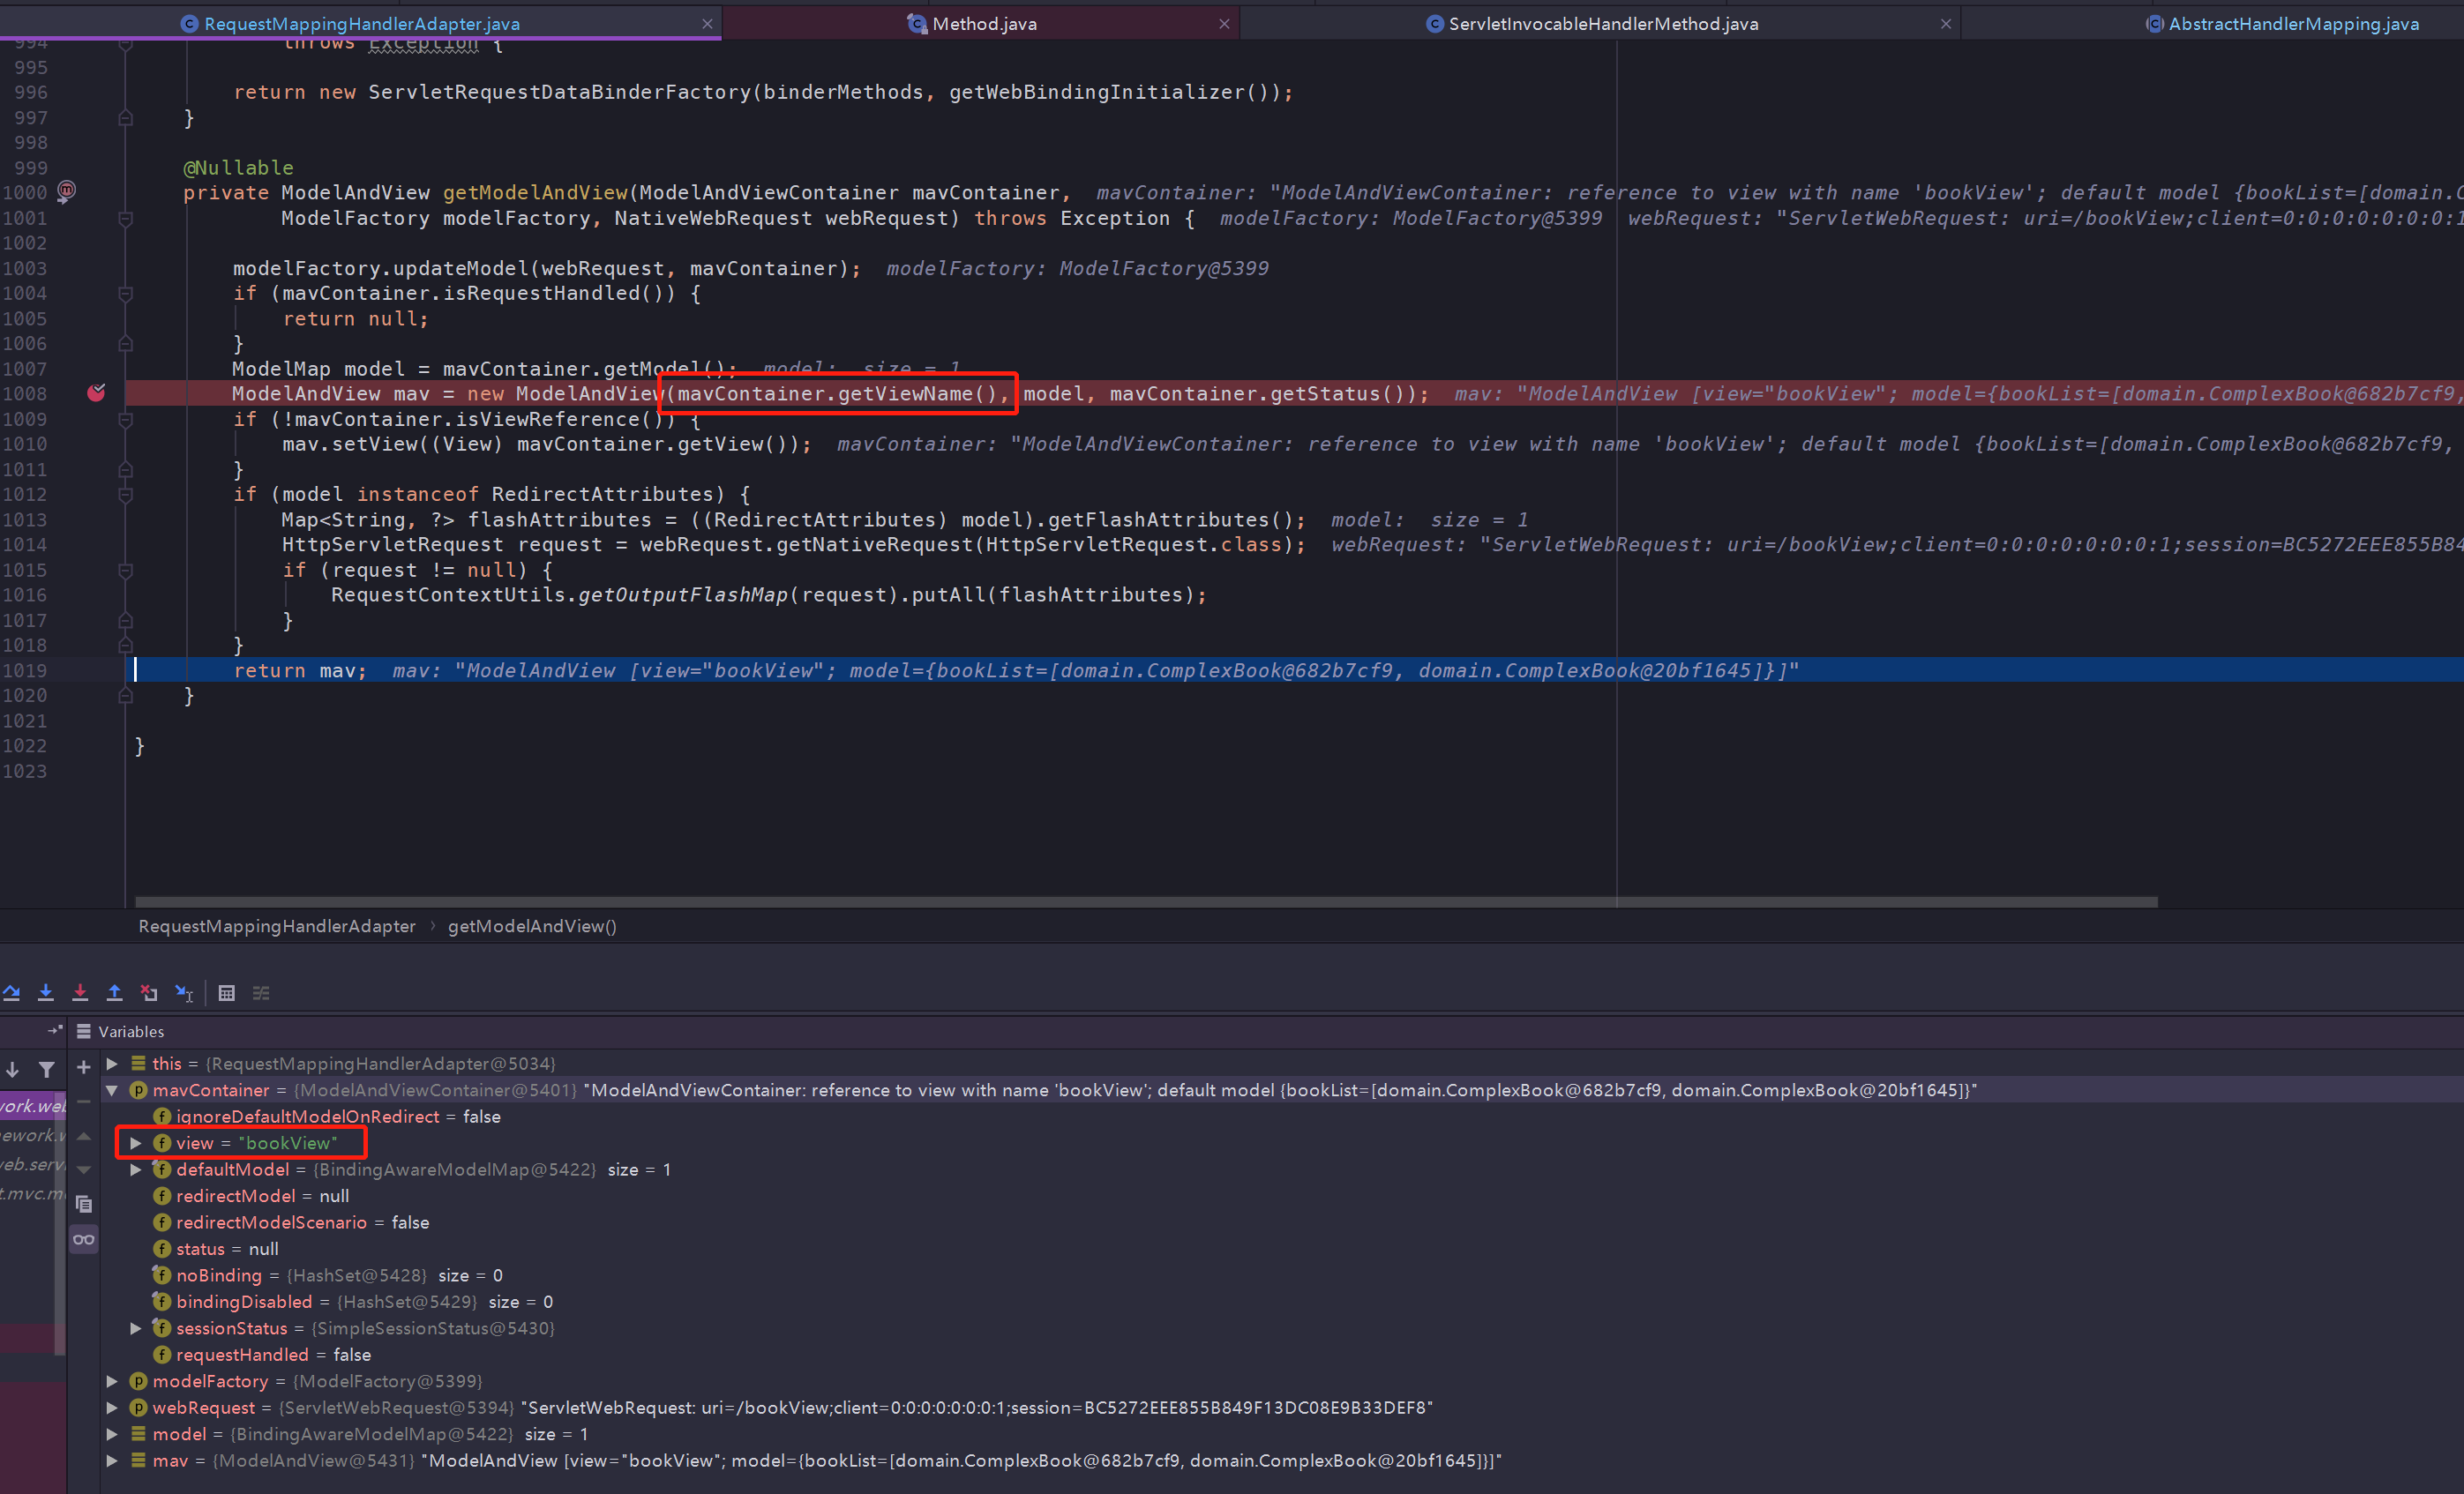
ViewNameMethodReturnValueHandler#handleReturnValue; 返回处理值,给 mavContainer 设置视图名称 viewName
|
|
最后在适配器中包装成了 ModelAndView 对象
视图渲染
根据处理器执行完成后,适配器包装成了 ModelAndView 返回给 DispatcherServlet 继续进行处理,来到了视图渲染的步骤:
DispatcherServlet#processDispatchResult
|
|
render
还记得我们使用的是 jsp 视图进行渲染么,引用的依赖是 jstl,所以视图渲染的是 JstlView 类提供的方法,以下是它的继承体系:
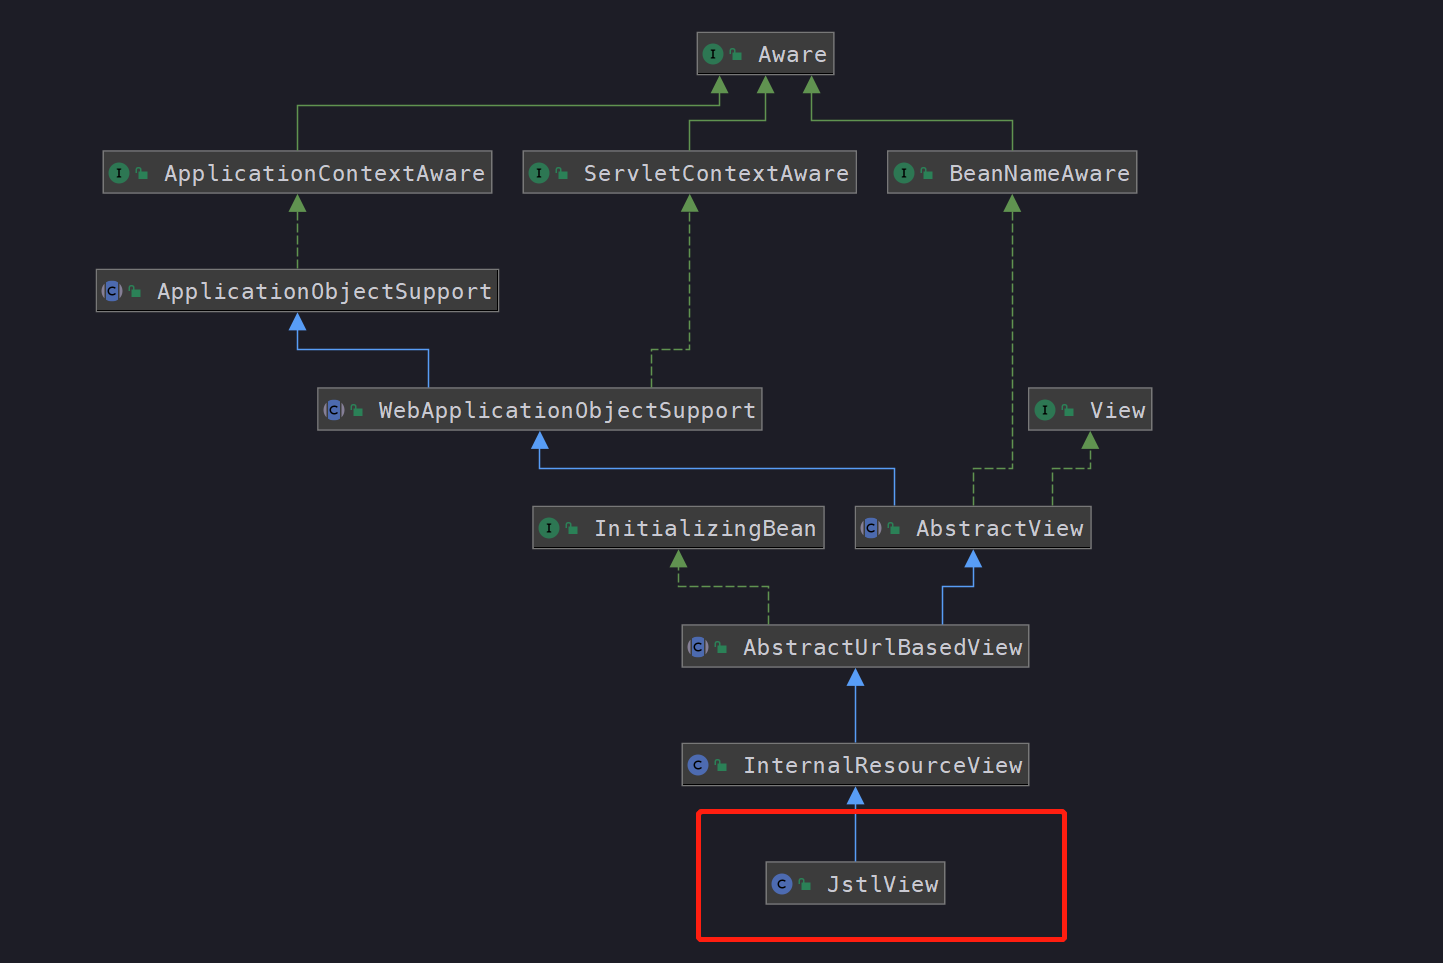
渲染调用的是其父类的方法:
InternalResourceView#renderMergedOutputModel
在给定指定模型的情况下呈现内部资源。这包括将模型设置为请求属性
|
|
最后发现渲染调用的是第三方依赖 org.apache.catalina.core.ApplicationDispatcher 进行视图绘制,所以不再跟踪下去。
所以整个视图渲染过程,就是在前面将 Model 视图对象中的属性设置到请求 request 中,最后通过原生(tomcat)的 ApplicationDispatcher 进行转发,渲染成视图。
总结
本篇比较完整的描述了 spring-mvc 的框架体系,结合 demo 和代码,将调用链路梳理了一遍,了解了每个环节注册的工具类或解析器,了解了 Spring 容器和 Web 容器是如何合并使用,也了解到 mvc 初始化时加载的默认策略和请求完整的处理逻辑。
总结起来,就是我们在开头写下的内容:
(1) 介绍如何使用
(2) 辅助工具类 ContextLoaderContext
(3) DispatcherServlet 初始化
(4) DispatcherServlet 处理请求
题外话
本篇笔记写得比之前的都要吃力,mvc 模块基本使用了之前总结过的知识点,一边学一边复习之前的知识,而且由于个人在开发环境遇到了阻塞,秉着 [自己都不能成功运行的代码,是不能提交的] 原则,处理了挺长时间。
在跟踪每个知识点时,越深入发现坑越多,想要将它描述完整,在学习理解和总结中不断循环,所以本篇花了很多时间,同时也有很多知识点没有去深入学习,例如 demo 中出现的 @RequestBody、@PathVarible 等注解是如何解析和返回结果处理,留个坑。
同时这篇笔记也是目前 Spring 源码学习的最后一篇技术总结,期望能得到朋友们的支持,如果写的不对的地方或者建议,请与我联系,我将完善和补充~
由于个人技术有限,如果有理解不到位或者错误的地方,请留下评论,我会根据朋友们的建议进行修正
Gitee 地址 https://gitee.com/vip-augus/spring-analysis-note.git
Github 地址 https://github.com/Vip-Augus/spring-analysis-note